The core premise is simple. You are processing raw resources into items, to then make even higher tier items out of them.
When you place your miners on ore deposits, they mine the ore wirelessly into the Depot.

To process specific items, you need specific machines. You put the item into the machine, it works for a bit, and spits out the resulting product. But dragging resources in manually is not fun, right?
That's where the automation with conveyor belts comes in.
On the PAC, your main base building, there are 6 output ports. You can set them to output a specific item from your Depot, and when you place a conveyor belt coming out of it, it will transport these items wherever you want.
You can then plug the belt into a machine. It will receive these items and process them. You can plug it into any of the 3 input ports.
Most machines need power to function - the Electric Pylon here provides power to everything in range.
Notice that the refiner also has 3 output ports - it will start ejecting the products made if you connect a belt to any of the outputs.
From there, you have a choice of either routing the resulting item back to the Depot to store it for later, or put it directly into another machine to make something else.
For Amethyst line, we first refine it into Amethyst Fibers,
then mould Amethyst Bottles out of them and send them back to Depot.
Now, all of this seems simple, right? But the real challenge comes from the fact that you want a specific item - for example, the Buck Capsule C to trade with the outposts to earn stock bills. How exactly do you produce an item in the most efficient way?
Ratios and Understanding Recipes
Let's look at the recipe.
The recipe will then appear on your screen in the top right while you're in the Core AIC area.
Okay, so it wants us to combine bottles and some kind of powder in a Filling Unit. In game, we click on the powder and click "Formula".
Seems straightforward. We want to use the Shredding Unit to shred Buckflower, and we get dust from it.
Notice, however, that doing this gives us two dust, not one! The belts move 1 item every 2 seconds, so if we plug one belt of Buckwheat into the shredder, we would need two belts to get them out, as one belt wouldn't be able to keep up and the shredder will clog. There's nothing wrong with clogging, but it's a sign we're not running at maximum efficiency.
Let's rotate the PAC so it's easier to see and build one side of the formula:
Now we take a look at the bottles:
Wait. The bottles want two Amethyst Fibers per bottle! So we will need two refiners to meet the demand.
Let's build that as well. It seems we'll have to move the Filling Unit a little bit.
Nice! We're making Buck Capsule C.
Jumpscare warning: we're actually not done here.
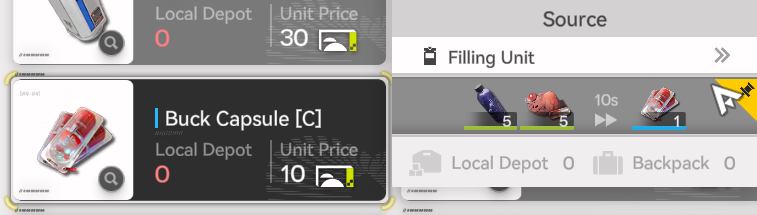
If you watch it run for a while, you'll notice that the Shredding Unit will start to clog. The Filling Unit for some reason cannot use the dust fast enough! Let's check our math on the recipe for the capsule:
It takes 10 seconds to make one capsule, and it consumes 5 of each item. We know belts move 1 item every 2 seconds - now let me teach you a useful mental shorthand!
We divide the recipe time by 2(10 / 2 = 5).
Then divide both item counts by that number: (5 / 5 = 1), (5 / 5 = 1).
This means that the machine wants 1 belt of each item.
We now know we have an extra dust. What do we do with it? We could just send it back to the Depot, or we can add another production line alongside the one we already made to make full use of the Shredder's output.
Let's double up the other side of the recipe, and Shredder will be our "middle".
We had to move stuff around to make it all fit nicely, but now our factory is working well and producing items at full power. Yay!
Because the output of both Filling Units is quite slow, it won't saturate a single belt. We can use a Converger to put their output on a single belt and send them away. You can also use a Protocol Stash to move your products back to the depot instead of snaking all the way back to the PAC.
Now, this wouldn't be a proper class without some homework! Eventually you will run out of Buckflower in your Depot. Take a look at the Seed-Picking Unit and the Planting Unit's recipes and figure out how to make the Buckflowers infinite!
Once you're done, congratulations! You're now a proud owner of buckloads of capsules. Engage in capitalism, obtain your Stock Bills and start eyeing the next recipe.
Optimizing Space
I'm still writing this! Check back later...